Saturday, September 29, 2007

Citrus Brioche

It feels so good to spend the weekend at home. Time with my kids and of course, some time for baking. Browsed through some bread books borrowed from the library and settled on 'Florida Citrus Brioche. It looks so delicious. Here's what I mean.

So I measured the ingredients, grated the orange dump everything into my breadmaker to knead the dough. Only then did I realise that the recipe requires that the dough be left to rest in the refrigerator overnight! NO patience for that, so I'll just bake it 'normal'.

Unfortunately, the end result was a far cry from the picture. Here's my citrus brioche


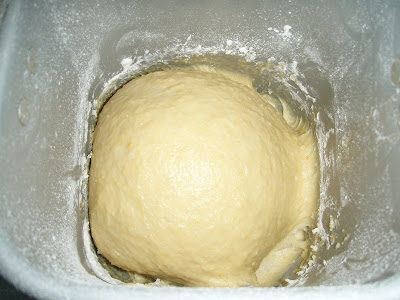
Had a few mishaps too.. I used plain flour instead of bread flour!!!! Gosh!! No wonder following the recipe did not give me a dough, but a cake batter instead. Plain flour absorbs less water than bread flour. In the end, I had to add an extra cup of flour to make the 'batter' come together... sigh...

Before adding extra flour


and after


And this is after shaping, proofed, brushed with egg and decorated with twisted orange slice.


Taste wise, it is nice and refreshing. Unfortunately not fluffy soft.. no fault of the recipe.. entirely mine.

So here's the recipe if you are interested.

Ingredients
------------
5 large eggs
2 tablespoon dry yeast
1/2 cup sugar
2 teaspoons orange extract
2 teaspoons grated orange rind
2 tablespoons high quality orange liquer (Cointreau or Grand Marnier)
3 and 1/2 cup bread flour
2 teaspoons salt
1 cup butter
1 egg, beaten for brushing
12 thin orange half slices, with peel, for garnishing

Method
--------

1. Mix eggs, milk, sugar, extract, orange rind, orange liquer and flour for 3 minutes on low speed
2. Switch to medium speed, add salt and knead for 7 minutes
3. Gradually add butter, and knead till a smooth uniform dough is formed
4. Cover with plastic and leave to rise in refrigerator overnight
5. Transfer dough to floured surface and punch down
6. Divide dough into 3 equal parts and each part into 4 pieces, for a total of 12
7. Roll each piece into a ball and place in a cup. Brush with beaten egg and top with a twisted half slice of orance. Let rise at room temp for 2 hours or until 3 times in size
8. Bake in 180 degree oven for 15 minutes, or until golden brown

I wish you success!
Friday, September 28, 2007

Amaretto Almond Rolls

Recently, I have been crazy about baking breads. Had been off cake for quite a while now.. probably a month?

Saw the recipe for Ameretto Almond rolls in the book 'The easy way to Artisan breads and pastries' by Avner Laskin. Hmm.... a double almond experience, who can resist trying it?

The end result was lovely!


Its a lean bread, not so sweet and is best eaten with some filling. Pop into the toaster prior to serving, this will crunch up the sliced almonds on top, then fill it with lettuce and ham and loads of mayonaise. My 4 year old loves it and can almost finish the whole roll! As he ate, he kept telling me 'Mummy, please make this again, OK?'. Such a sweet boy. :-)


Here is the recipe.
Ingredients
-------------
1 cup cold milk
2 tablespoons dry yeast
1/3 cup sugar
1 large egg
2 and 1/2 cups bread flour
1 cup ground blanched almonds
3 tablespoons real amaretto liquer
1 teaspoon salt
1/4 cup butter
1 egg, beaten, for brushing
brown sugar and sliced almonds for garnish
Method
--------
1. Mix all dry ingredients for a minute
2. Add wet ingredients i.e. milk, ameretto, egg. Mix till mixture comes together
3. Add butter, knead till a smooth, stretch-able dough is formed
4. Cover with plastic wrap and let rest for 1 hour
5. Punch dough, divide into 2 equal parts, then each part into 5 pieces, for a total of 10 pieces
6. Shape each piece
7. Place rolls 2 inches apart on baking sheet and brush with beaten egg.
8. Sprinkle a little brown sugar and a few sliced almonds on top and proof for 1 hour
9. Bake in preheated 190 degree celcius oven for about 15 minutes or until golden brown.
In my case, I did not have ground blanced almond on hand. So I ground some almonds (with skin on) and replaced with that. Problem was the mixture was extremely watery, I had no choice but to add more flour, about 1/2 cup more. I later read that blanched almonds can absorb more water than almond with skin on.. so that may be the reason. In any case, the result was still pleasing.
If you do have a chance to follow the recipe exactly, please share your results.
Adious!

Wednesday, September 26, 2007

Volkswagen cake

This is my first paid cake. My first order from a very kind friend for her beloved hubby. I was told that he was looking forward to upgrade to a Volkswagen Golf.


For an entire week, I was extremely bothered. I could not trust myself to create an edible car without it looking like a cartoon. So this is what I came up with :


The cake is a 7 inch round, cut into 1/3, 2/3 pieces and the smaller piece placed on top of the bigger piece (can understand?), to form the couch. Frosted in pale blue fresh cream. Man and cushion is fondant. The 'dream cloud' is white chocolate. Car is made from layers of fondant. I also used the tip of a toothpick to write the car plate number and outline the lights.


Overall, I liked the appearance of the cake.. with a touch of humour.

Update (26 June 2008) - this guy's dream got fulfilled this year. Congratulations!

Sunday, September 23, 2007

Pig Pen

Currently on business trip in Dubai. In the air-conditioned comfort of the hotel room, away from the blistering heat. Its REALLY hot hear. Singapore is hot, this is searing hot.

Thought I'd just share this cake, one of my favourites, before I turn my attention back to the slides that I am supposed to present tomorrow. :-)

Cake was baked for brother-in-law who was born in the year of the pig. Cake design was inspired by Debbie Brown. She used all fondant, but I am not quite skilled in using fondant to cover cake yet, so mine is all in fresh cream, except for the little piggies which are fondant.


Sorry about this pic, a little blurry, but the only one I have with the Happy B'day sign. Sign is fondant wrapped round a piece of biscuit.

This one is a slightly different view. You can see the little pig with flower on its head. So adorable, right? Did you see the one with back view? Notice the curly tail?


Here are the piggies, drying in a pan.


Got to go! Presentation slides waiting.....

Friday, September 21, 2007

Fisherman cake

My husband is an avid golfer turned avid game fisherman.


On his birthday in March this year, I baked him a cake capturing him in his favourite hobby. This is my first attempt at figure modelling using fondant. As it was a weekday, I had to squeeze in cake baking and decorating into my busy work schedule. Baked cake the night before. It was a carrot cake, so the preparation and baking took a loooong time. Frosted and decorated the cake (without the figure) in the morning before going to work. Made the figure half an hour before leaving for the restaurant in the evening. Here is the result.


See how the guy look cross-eyed? He certainly looked funny. But I was glad that the cake looked good overall and tasted great too.


Did another fisherman cake recently, in July. I think this time I did a better job at figure modelling. At least can see his fingers and toes. :-)


Other details in the cake includes - a sailfish, star fish, bait box with worms, crab (hidden behind the boat).

I had some problems with this brand of non-dairy cream, cannot remember the brand, but its made in U.S. Not easy to handle and gets 'hole-y' when handled too much.

Thursday, September 20, 2007

3-D House Cake

My colleague and friend had a house warming, a golden opportunity for me to try a baking a house cake. Since its probably a one-off thingy, there was no point to buy a special pan for this.

So, I drew up the following plan based on a rectangular cake.


Here is the end result. All frosted and decorated with fresh cream. Not quite a fan of buttercream.
Front view - foot path lined with stone shaped chocolates. Small pieces of cake shaped into a cone, held in place using a toothpick, then covered with piped leaves. White fence round the sides.

Back view - with friend's last name. I added that because it was getting late and I was too tired to pipe little stars to cover the entire back! Well, that gave it a personal touch.


Many people were amazed by the cake *blush*, some thought it was part of the home decoration *blush* *blush*.

Wednesday, September 19, 2007

Roses

I love to decorate my cakes with piped fresh cream roses. Why? Because it is easy (once you get the hang of it) and it NEVER fails to impress. :-) People always ask 'You did that?' 'How?!'.


This is my first rose basket, created at the end of my cake decoration class in March.


This one's for my mum's birthday, roses and scrolls.


This is one of my favourites, baked for Mother's day in May 2007. Isn't it lovely?


Baked this next one when we were invited to a friend's place for dinner. Its a black forest cake with lots and lots of fresh cream roses.

This is the most recent one. Baked when we are invited to a church gathering for new comers. We are currently settling down in QBC.


Are you having an overdose of roses yet?

Tuesday, September 18, 2007

Heart Shaped Cake to say 'Thank You'

My MIL helps me with my two young children and I am extremely grateful to her for dedicating her time and energy on my two bundles of endless energy :-)

So one of the very first cakes I baked and decorated was one to convey my heartfelt thanks.


The idea was taken from one of Wilton's cake decoration books. The borders are piped rosettes - bigger rosettes for the bottom border and smaller ones on top. I also made small icing sugar flowers in pink and white, let them dry out, then placed them onto the rosettes at the top border.

Through this cake, I learned that icing sugar decorations are NOT meant for the refrigerator! The little flowers softened and lost its shape. Thankfully, it did not drip down the sides... so the cake still looked pretty.

Monday, September 17, 2007

Sharing My Creations

I got interested in baking three years back when I bought my son's first birthday cake from a home baker. The cake tasted great and I was inspired to create my own personalised cakes at home. I chanced upon Creative Culinaire on the web and without hesitation, signed up for Chef Judy's cake baking and decoration classes. Chef Judy is really a gem of an instructor!

This is one of my favourite cakes baked with tips learned from the lessons. Its for my son's third birthday last year and his favourite cartoon is Winnie the Pooh.

My oven is small, so I had to bake two ten inch cakes and join them together :


Then I trace the picture I want with chocolate and use marshmellows as decorative borders :


Finally, fill in the colours. This took me ages! But the result was good, the cake was very well received. :-)


Will be sharing more of my creations. But I'd probably start with the ones I created in the past. Being a working mother of two, juggling work, family and hobby is certainly not easy!