Sunday, December 30, 2007

Chocolate Wassant

I am a fan of the chocolate wassant bread at Provence Bakery, so are a lot of my friends and colleagues. Sometimes, at lunch time, we would detour to Holland Village to pick up bags of the soft, fluffy bread.

And after coming across the chocolate swirl bread at Happy HomeBaker blogsite (sorry I don't know how to create a link), I decided to use the recipe of the chocolate paste and my favourite cream bread recipe to re-create the chocolate wassant at home.

Here's a tray of lovely wassants :


Not quite as lovely as the ones at Provence, but hey, I'm only a novice. This is actually my fourth attempt already. I think the best was my third attempt, which I managed to get three layers (like Provence's, as I observed) of chocolate paste in between before I roll them into tiny croissants.


I rolled out the bread dough into a large rectangle and spread the chocolate paste on it using a spatula. Hmm.. an idea just crossed my mind, next time, I will try spreading nutella, I bet it will taste just as great. The best will be three layers of chocolate, but I only managed two. Roll the dough even thinner, then cut them into little triangles. Roll each triangle like a tiny croissant and they will look lovely like this :


From my last few attempts, I learned that what is key to ensuring that the bread is soft and fluffy is to ensure that you do not bake it too long. My first attempt, I baked at 180 degrees for 12 minutes. It was OK, but not soft enough. In this attempt, I baked the bread at 200 degrees for about 8 minutes. The bread is soft, slightly crisp outside and very nicely browned, without any egg-wash. But I think the best was when I baked it at 180 degrees for 8-9 minutes, almost as soft as Provence's and stayed that way for couple of days.

Friday, December 28, 2007

Nativity

Two Christmases ago, I saw a nativity cake on CakeCentral and secretly harboured the ambitions to create a similar cake. It was full of beautifully hand modeled fondant figurines that I can only dream of making. This Christmas, I finally made my version of the nativity cake, drawing inspirations from the one that I've seen, for a family Christmas eve party.

Here's Joseph, Mary and baby Jesus....


I used store-bought Wilton fondant to mould the figures. I usually buy the white coloured ones as they are cheaper and I can colour them on my own, using Wilton gel colours. Baby Jesus was suppose to be sleeping on a bed of straws.. I did not have the tools to make the straws so it looked as if he is sleeping on a bed of worms... The two beige round lumps you saw at the back are 'heads'. I was thinking of making the three wise men but I ran out of fondant and had to make two shepherds instead. Then I realised I did not even have enough fondant for two shepherds... so I made my own gumpaste (since this is the only recipe I have on hand that I have all ingredients).

Here's the final cake.


The pictures was not very well taken as I only managed to finish the cake like half an hour before the party and the lighting was bad. But I thought its a very lovely cake, couldn't wish for more. Cake is 12" chocolate banana cake with low fat ganache (recipe from Creative Culinaire).

Closeup.


The thing about fondant is that it 'sweats' when put on top of icing and colour can smear so I usually try to use less strong colours to prevent dis-colouring my cakes.


My favourites are the little lambs.. they are tiny as a twenty cent coin and really cute. I smeared compound chocolate on the cake board, let it harden about 80%, then sprinkled some brown caster sugar on top before placing the figures on top. I like the effect, it looks like sand with a little bit of shimmer. Grass is icing sugar left over from my cookies decoration.

The shepherd with the beard is made with my home-made gumpaste and it dried solid hard but is also brittle, especially the thin parts. The fondant made ones are still malleable. This is my first experience with gumpaste.. will try putting him in the fridge to see if he 'melts'.


Here are some of the cookies that I made. Merry Christmas and a very Happy New Year to you!! Cheers!!


And a very happy snowman!

Monday, December 10, 2007

Christmas!!

Wow! Has been more than a month since my last post... how time flies...

Had been busy at work and at home with little time for baking. Even had to turn down some opportunities to create cakes.

My little girl is going through the 'terrible twos' phase and her bad temper is ignited by the smallest thing that goes against her wishes. She'd then cry inconsolably for the next hour. I'm almost pulling my hair out!

Anyway, here are some cookies and treats I made last year for the Christmas season. I pray I get sometime to do the same this year.

1) Marshmellow Snowman


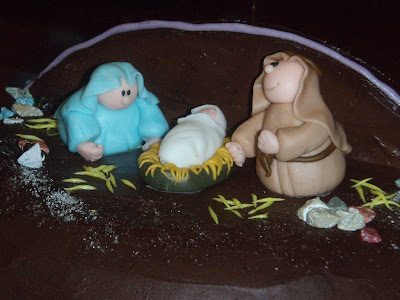
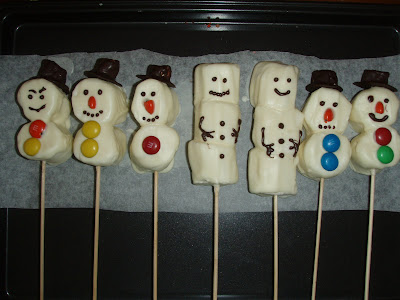
Marshmellows coated with white chocolate, on a skewer. M&M buttons and noses. Eyes and hands are piped chocolate. Easy to make and oh so cute!

2) Christmas cookies

An assortment of chocolate cookies (recipe taken from wilton), decorated with royal icing, which I packed in little bags and gave away to dear colleagues in the office.

How long did it take to decorate these? Back-breaking long.


3) Joy to the World!


The Lord is come! Christ bring salvation to the nations and we celebrate with joy, the birth of baby Jesus.


Stained glass effect created using coloured piping gel.


A Merry Christmas to all! May you experience the real joy of Christmas.

Friday, November 16, 2007

Sandals and ipod

Apologies! Had been so busy lately. Did do some baking on the weekends, but have not even uploaded the files from camera to computer yet.... So I'll share some pics of cake I've done some time ago.

This one's for my nephew's 21 birthday. A 'cool' cake - beach theme, complete with sandals, 'sand' sea shells, starfish, a crab and the indispensable ipod for the young adult. Everything is edible, except the 'screen' of the ipod which is just a piece of paper.

The straps of the sandals of strips of licorice. Sea shells, crab, starfish are all made of fondant. The ipod is biscuit wrapped with fondant. I am especially proud of the ear phones, I thought they look quite real. *argghh* cannot find a close-up pic of the ear phones.


Anyway, a lot of his guests were amazed by the cake and they actually ate up the earphones and the ipod...

Tuesday, October 23, 2007

Choo Choo Train & scenery

Here is my son's birthday cake. Took me the whole day! From 9 am in the morning till about 5pm. Baked the cakes from scratch, the bottom is a chocolate banana cake iced with chocolate ganache, top cake is mango sponge cake frosted with whipped cream.


Notice the shark's fin in the water? And the dolphin?

The puffy things on top of the cake are clouds.

The wheels of the train are mini oreos. Trains are fondant cutouts. I had wanted to make 3-D trains but the space between the cakes is not wide enough. Anyway this is so much simpler.

The trees will look better with smaller leaves but I could not locate my smaller 'leaf' tip.

Unfortunately, the chocolate banana cake was not too well recieved at the party, while everyone loved the mango cake. The chocolate cake was too hard as it just came out from the fridge, but tastes splendid when at room temperature.

Here's the cake while work in progress. Generous spread of bananas.


The layers.. I did not fill the cake with enough chocolate ganache...end out with many gaps between the banana pieces.

The two cakes, frosted and stacked.


Sorry about the mess in the background and lousy photography. Must go take some lessons from a good friend who will officially turn full time professional photographer next week!! Congrats, Yu Hsin, on your freedom from the corporate world!

Sunday, October 21, 2007

Chicka Chicka Boom Boom

My son has a fascination with alphabets and numbers. He enjoys all books about Alphabets and counting. One of his favourite book is 'Chicka Chicka Boom Boom' by Bill Martin Jr. (Author), John Archambault (Author), Lois Ehlert (Illustrator). The book is about all the alphabets trying to find room up in a tree. Here's what the book cover looks like.

I used this theme for his first birthday cake. 'First' because this cake is used for celebration in his preschool on 19th Oct. A 'Second' cake will be baked for his home party on 20th Oct. Last year, I baked a total of three Winnie the Pooh cakes for him for three seperate celebrations!


I am quite against using too much colouring in my fresh cream as it taints the mouth, especially for messy kids. So there is no way I will replicate the above. Imagine all the kids with orange, green and pink mouths, am sure the parents will come after me. Here is my interpretation :


All fresh cream except for fondant bunny, fondant letters (cut using cookie cutters), dark brown fondant 'coconut' and chocolate 'rocks'.

Although the bunny is cute, I regreted putting it there. It just does not seem to blend well with the overall design of the cake. But it was almost 11pm when I finished decorating the cake on a Thursday night. After a long day at work, I simply did not have the energy to re-do it. Anyway, the little four year old kids will not notice... and I am right.

Stay tuned for my second birthday cake. I promise it will be much more elaborate.

Tuesday, October 16, 2007

A man and what he loves

I think cakes for men are so much harder to design than cakes for women. If all else fails, just add some flowers on the cake and it will look gorgeous. But for man .... a lot more thinking and more work is required.

Created this cake for an uncle of mine. This cake tells a LOT about this uncle: he loves napping, coffee, TV (see the remote control?), reading the newspaper (particularly on stocks) and some dessert. I thought its quite a cute cake, with lots of details. :-)

The couch and sidetable are small pieces of cake smeared with some jam and then covered in fondant. I left it out in my kitchen in our humidity and had the biggest shock when I came home from work, ready to go to the party. The couch and table had melted!! I had to re-create the couch, man (as he was stuck to the melted couch), remote control and side table all in 30 minutes! The only items I could salvage was the coffee, cake and newspaper.

Below was the first set of figurine and details. Notice how 'wet' and sloppy the couch looked. I reckoned I put too much jam beneath the fondant and the fondant was rolled too thin. Lesson learned.

The new couch looks better, but the remote was way too thick... looks more like a phone. Did you notice that little fork on the cake plate?

The first thing my son said when he saw the cake was ' Where's the TV? Mummy you forgot the TV'. I wish I had more space on the cake and a little more time...

Thursday, October 11, 2007

Farewell... Adious

This cake was made back in August, when a dear colleague decides to leave for greener, eh, to be politically correct, new pastures.


Which animals are in constant look-out for greener, eh, new pastures? Sheeps of course. My little lambs are made of fondant with royal icing wool. The body is a mini sausage sized fondant. Royal icing piped with round tip, all over the mini sausage, except for bottom and front. Royal icing will appear pointed, hence you'd need to smooth out the points with your finger.


I also made mini fondant flowers in three different colours using fondant cutters.

Pebbles are just black and white marbled fondant pressed flat.

So, here is my final "We'll miss ewe!" cake.


If you can read the words on the pole, it says 'new pastures'. Well, some people move on, others stay but life goes on!!

Wednesday, October 10, 2007

Dinosaur!!

A good friend of mine challenged me to make a dinosaur cake for her son. I say this is a challenge because I have not seen a very nice dinosaur cake before. Most cakes use toy dinosaurs as decorations. Others are 3D dinosaurs which either end up too 'cartoony' or are impossible for an amateur like me to replicate.

The cake was picked up last night. And till midnight the night before, I still had no idea what to do!! I baked the cake, frosted it white, piped trees at the sides and the top was completely blank, like my mind.

I searched for a nice picture to 'print' on top of the cake.

In the end, I opted for a 2D T-Rex. Here's comparing my 2D fondant creation with the actual picture :

Looks pretty impressive yeah? So I guess the four years I spent in the Art Elective Program in Secondary school was not in vain. :-) Took me about 1.5 hours to do this..... kind of long ... but I had to stick on the tooth one by one...

Here's the finale - the cake!


I must say I am very pleased with the final outcome (well, except for the handwriting). I added the finishing touch of gummy dinosaurs at the sides.. all kids love those little gummies...

Now the birthday boy is asking for transformer cake!! I may have to skip this... too challenging.. but I have till tonight to decide...

Tuesday, October 9, 2007

Rye Bread

This is a good rye bread recipe. Oops.. cannot remember which book I got it from. The bread is soft and nutritious. Tastes excellent when lightly toasted... yum..


Looks good too, doesn't it? Kind of professional. :-)

Here's the recipe:

(A)
200g bread flour
50g rye flour
25g wholemeal flour
10g sugar
1/2 tsp salt
2 tsps instant yeast

(B)
1 tsp honey
170ml water

(c)
10g butter

(D)
35g chopped walnuts, optional

Method
--------
1. Mix (A) till well blended
2. Add (B) an knead to form a dough
3. Add (C) and knead to form a smooth, elastic dough. Do the 'window pane' test
4. Add (D) and mix till well combined
5. Cover dough and leave to rise for 30 minutes
6. Punch down. Divide dough into 2 equal pieces and shape into balls
7. Shape balls into ovals
8. Spray some water on the dough and sift some rye flour on top
9. Use a sharp knife to cut out leaf shapes
10. Bake at 200 degree celcius for 20 to 25 minutes

Have tried this recipe couple of times now and was successful each time. My family and extended family enjoy this bread, so do try it.

Tuesday, October 2, 2007

Fruited Muesli bread

I love Sundays. Missing church service last week made me enjoy this week's service even more. There are just so many things to thank the Lord for!

Although its my domestic helper's day off on Sunday, I still managed to bake quite a few breads. Thanks to my dear hubby and wonderfully good children.

I made the fruited muesli bread, as I have too many bags of muesli at home! The result looked and tasted good too. Unfortunately, when left overnight, was a little hard, not sure if it was because I did not proofed it long enough.


Here it is, shaped, brushed with eggwash, sprinkled with some muesli and 'imprinted' using star shaped cookie cutters.


And this is the final result, golden brown and healthy.


Here's the recipe

Ingredients
------------
475g bread flour
2 tablespoon milk powder
3 tablespoon light brown sugar
1 teaspoon salt
1 teaspoon ground cinnamon
2 tablespoon butter
100g fruit muesli
1 and 1/4 teaspoon active dry yeast
300ml water
100g ready to eat dried apricots
50 g dried cranberries (i replaced with raisins)

Method
---------
1. Mix all dry ingredients for 1 minute (except apricot and cranberries)
2. Mix in wet ingredients, except butter
3. Knead till dough come together
4. add butter, knead till dough is smooth and elastic
5. Add apricot and cranberries, mix till even, do not over mix
6. Cover dough and rest for 1 hour
7. Punch down, divide into 2 portions and shape into balls
8. Brush with egg wash, sprinkle some muesli on top
9. use cookie cutter to 'print' on the dough
10. Leave to proof for an hour
11. Bake at 180 degrees for half hour. Bread should sound hollow when tapped with finger tips
12. Cool on wire rack

I also baked some rye bread which I gave away. Its getting late, so I'll share next time.

Saturday, September 29, 2007

Citrus Brioche

It feels so good to spend the weekend at home. Time with my kids and of course, some time for baking. Browsed through some bread books borrowed from the library and settled on 'Florida Citrus Brioche. It looks so delicious. Here's what I mean.

So I measured the ingredients, grated the orange dump everything into my breadmaker to knead the dough. Only then did I realise that the recipe requires that the dough be left to rest in the refrigerator overnight! NO patience for that, so I'll just bake it 'normal'.

Unfortunately, the end result was a far cry from the picture. Here's my citrus brioche


Had a few mishaps too.. I used plain flour instead of bread flour!!!! Gosh!! No wonder following the recipe did not give me a dough, but a cake batter instead. Plain flour absorbs less water than bread flour. In the end, I had to add an extra cup of flour to make the 'batter' come together... sigh...

Before adding extra flour


and after


And this is after shaping, proofed, brushed with egg and decorated with twisted orange slice.


Taste wise, it is nice and refreshing. Unfortunately not fluffy soft.. no fault of the recipe.. entirely mine.

So here's the recipe if you are interested.

Ingredients
------------
5 large eggs
2 tablespoon dry yeast
1/2 cup sugar
2 teaspoons orange extract
2 teaspoons grated orange rind
2 tablespoons high quality orange liquer (Cointreau or Grand Marnier)
3 and 1/2 cup bread flour
2 teaspoons salt
1 cup butter
1 egg, beaten for brushing
12 thin orange half slices, with peel, for garnishing

Method
--------

1. Mix eggs, milk, sugar, extract, orange rind, orange liquer and flour for 3 minutes on low speed
2. Switch to medium speed, add salt and knead for 7 minutes
3. Gradually add butter, and knead till a smooth uniform dough is formed
4. Cover with plastic and leave to rise in refrigerator overnight
5. Transfer dough to floured surface and punch down
6. Divide dough into 3 equal parts and each part into 4 pieces, for a total of 12
7. Roll each piece into a ball and place in a cup. Brush with beaten egg and top with a twisted half slice of orance. Let rise at room temp for 2 hours or until 3 times in size
8. Bake in 180 degree oven for 15 minutes, or until golden brown

I wish you success!

Friday, September 28, 2007

Amaretto Almond Rolls

Recently, I have been crazy about baking breads. Had been off cake for quite a while now.. probably a month?

Saw the recipe for Ameretto Almond rolls in the book 'The easy way to Artisan breads and pastries' by Avner Laskin. Hmm.... a double almond experience, who can resist trying it?

The end result was lovely!


Its a lean bread, not so sweet and is best eaten with some filling. Pop into the toaster prior to serving, this will crunch up the sliced almonds on top, then fill it with lettuce and ham and loads of mayonaise. My 4 year old loves it and can almost finish the whole roll! As he ate, he kept telling me 'Mummy, please make this again, OK?'. Such a sweet boy. :-)


Here is the recipe.
Ingredients
-------------
1 cup cold milk
2 tablespoons dry yeast
1/3 cup sugar
1 large egg
2 and 1/2 cups bread flour
1 cup ground blanched almonds
3 tablespoons real amaretto liquer
1 teaspoon salt
1/4 cup butter
1 egg, beaten, for brushing
brown sugar and sliced almonds for garnish
Method
--------
1. Mix all dry ingredients for a minute
2. Add wet ingredients i.e. milk, ameretto, egg. Mix till mixture comes together
3. Add butter, knead till a smooth, stretch-able dough is formed
4. Cover with plastic wrap and let rest for 1 hour
5. Punch dough, divide into 2 equal parts, then each part into 5 pieces, for a total of 10 pieces
6. Shape each piece
7. Place rolls 2 inches apart on baking sheet and brush with beaten egg.
8. Sprinkle a little brown sugar and a few sliced almonds on top and proof for 1 hour
9. Bake in preheated 190 degree celcius oven for about 15 minutes or until golden brown.
In my case, I did not have ground blanced almond on hand. So I ground some almonds (with skin on) and replaced with that. Problem was the mixture was extremely watery, I had no choice but to add more flour, about 1/2 cup more. I later read that blanched almonds can absorb more water than almond with skin on.. so that may be the reason. In any case, the result was still pleasing.
If you do have a chance to follow the recipe exactly, please share your results.
Adious!

Wednesday, September 26, 2007

Volkswagen cake

This is my first paid cake. My first order from a very kind friend for her beloved hubby. I was told that he was looking forward to upgrade to a Volkswagen Golf.


For an entire week, I was extremely bothered. I could not trust myself to create an edible car without it looking like a cartoon. So this is what I came up with :


The cake is a 7 inch round, cut into 1/3, 2/3 pieces and the smaller piece placed on top of the bigger piece (can understand?), to form the couch. Frosted in pale blue fresh cream. Man and cushion is fondant. The 'dream cloud' is white chocolate. Car is made from layers of fondant. I also used the tip of a toothpick to write the car plate number and outline the lights.


Overall, I liked the appearance of the cake.. with a touch of humour.

Update (26 June 2008) - this guy's dream got fulfilled this year. Congratulations!

Sunday, September 23, 2007

Pig Pen

Currently on business trip in Dubai. In the air-conditioned comfort of the hotel room, away from the blistering heat. Its REALLY hot hear. Singapore is hot, this is searing hot.

Thought I'd just share this cake, one of my favourites, before I turn my attention back to the slides that I am supposed to present tomorrow. :-)

Cake was baked for brother-in-law who was born in the year of the pig. Cake design was inspired by Debbie Brown. She used all fondant, but I am not quite skilled in using fondant to cover cake yet, so mine is all in fresh cream, except for the little piggies which are fondant.


Sorry about this pic, a little blurry, but the only one I have with the Happy B'day sign. Sign is fondant wrapped round a piece of biscuit.

This one is a slightly different view. You can see the little pig with flower on its head. So adorable, right? Did you see the one with back view? Notice the curly tail?


Here are the piggies, drying in a pan.


Got to go! Presentation slides waiting.....

Friday, September 21, 2007

Fisherman cake

My husband is an avid golfer turned avid game fisherman.


On his birthday in March this year, I baked him a cake capturing him in his favourite hobby. This is my first attempt at figure modelling using fondant. As it was a weekday, I had to squeeze in cake baking and decorating into my busy work schedule. Baked cake the night before. It was a carrot cake, so the preparation and baking took a loooong time. Frosted and decorated the cake (without the figure) in the morning before going to work. Made the figure half an hour before leaving for the restaurant in the evening. Here is the result.


See how the guy look cross-eyed? He certainly looked funny. But I was glad that the cake looked good overall and tasted great too.


Did another fisherman cake recently, in July. I think this time I did a better job at figure modelling. At least can see his fingers and toes. :-)


Other details in the cake includes - a sailfish, star fish, bait box with worms, crab (hidden behind the boat).

I had some problems with this brand of non-dairy cream, cannot remember the brand, but its made in U.S. Not easy to handle and gets 'hole-y' when handled too much.

Thursday, September 20, 2007

3-D House Cake

My colleague and friend had a house warming, a golden opportunity for me to try a baking a house cake. Since its probably a one-off thingy, there was no point to buy a special pan for this.

So, I drew up the following plan based on a rectangular cake.


Here is the end result. All frosted and decorated with fresh cream. Not quite a fan of buttercream.
Front view - foot path lined with stone shaped chocolates. Small pieces of cake shaped into a cone, held in place using a toothpick, then covered with piped leaves. White fence round the sides.

Back view - with friend's last name. I added that because it was getting late and I was too tired to pipe little stars to cover the entire back! Well, that gave it a personal touch.


Many people were amazed by the cake *blush*, some thought it was part of the home decoration *blush* *blush*.