Monday, July 27, 2009

Pistachio Almond Cookies

I love the cookies at Marks and Spencers. I was there to pick up some organic Camomile tea recently and browse through its array of cookies. There's my favourite rich tea and ginger snaps and a whole lot of new flavours! What caught my eye was Almond and Pistachio cookies, and Orange and Cranberry cookies. Well.. I did not buy them, but I was inspired to bake some cookies.

When I went home, I searched through the trusty network of food bloggers and found a Pistachio Almond Cookie recipe at Sugar and Everything Nice. The cookies looked so good, I printed the recipe and immediately get going.

I also saw a recipe in Kitchen Culture magazine, Cranberry Almond Cookies and decided to use the same almond cookie recipe base to make both cookies.

The result - I love the pistachio cookies! The cookie is so buttery and light and the pistachio added a nice nutty crunch. The cranberry ones are great too, but they taste much better the following day.


The pictures look so different, because they were taken at different times of the day. I really must work on my lighting. But I am lazy. As it is, I am already like squeezing out time to bake amidst looking after my three young ones on weekends.
Here's the recipe.
Pistachio & Almond Cookies
Recipe Adapted from The Cookie Collection
Makes about 30 cookies ( I made 28)
Ingredients:
225g unsalted butter, softened
140g castor sugar
1 egg yolk, lightly beaten
2 tsp vanilla extract
225g plain flour
55g ground almonds
55g pistachio nuts, finely chopped
1/2 tsp salt
Method:
1) Put the butter and sugar into a bowl and mix well with a wooden spoon (I use the mixer). Then beat in the egg yolk and extract.
2) Sift the flour and salt into the mixture. Add the ground almonds and stir until thoroughly combined. Halve the dough, shape into balls, wrap in clingfilm and chill in the refrigerator for about 40 minutes.
3) Preheat the oven to 190C. Line 2 baking sheets with baking parchment.
4) Unwrap the dough. Pinch some dough, about 1 tablespoon, and roll into a ball. Put on the baking sheet, spaced well part. Flattened each ball slightly with your palm.
5) Sprinkle some chopped pistachio on each cookie. Press lightly so that it stays.
6) Bake for 10 - 12 minutes. Leave to cool on the baking sheets for 5 - 10 minutes, then using a palette knife, carefully transfer the cookies to wire rack to cool completely.
I baked mine for about 13-14 minutes as I like it slightly firmer. For the cranberry variation, I added the cranberry into the dough prior to refrigeration.

Sunday, July 26, 2009

Bread!

Realised I had not baked bread for quite a while. I tried to set aside some time last weekend to bake some. Unfortunately, after kneading the bread, we decided to go out for lunch. So I had to pop the dough into the fridge to prevent it from over proofing. I had not done this before, so was a little worried that all effort will go to waste.

When I came back from lunch, about 3 hours later, the dough had proofed to much that it filled the entire large container that I used to store it. Punched it down and tried to knead it, but it was wet due to condensation... I had to used quite a fair bit of flour on the table to prevent it from sticking. I was concerned that all the excess flour will make the bread hard.

But the final result was as good as I remembered of the results of my last attempt using the same recipe.

I made some hot dog buns (again!), raisin buns and cranberry buns.


Some tips for softer bread

1) the dough must pass the stretch test

2) allow time for final proofing to make sure the dough grows double in size

3) When using dried fruits like raisins, always remember to soak in a little bit of water for at least half hour. Pour away the water before adding into dough.

4) Substitute some bread flour with all purpose flour

Have fun!

Saturday, July 18, 2009

Princess Carriage

Samantha is like any other girl. Loves pink, cute little things and princesses. Her birthday cake last year was a carousel cake, very challenging. This year, I kept it simpler.

I made a cinderella carriage from gumpaste. With gumpaste wheels. With a little gunpaste Cinderella shoe and a tiny weeny magic wand. I had wanted to mould little mice as carriage-man, but I ran out of time.


It is no where near the brilliant ones that I saw on the internet. Nevertheless, I am happy with the final cake.


You can see many mistakes.. like the number 4, which is wobbly and the ribbons are of different shades of pink. The daisies are there to cover mistakes too. The cardboard that I put the carriage on was slightly bigger than the cake, leaving gaps in between. But I had fun.

Here's princess Samantha.


The party was at McDonald's. She had been looking forward to it since her brother's birthday last October. The children had a wonderful time.


The following day, I had my family come over for dinner and have a mini birthday celebration. I baked a black forest cake but had little time to decorate , as I had to help prepare dinner. And Nathalie was not too cooperative. She cried as she was not too familiar with my family. I iced part of this cake while holding her in one hand. I cheated by re-using the carriage from previous day.


See how terrible the icing was done? Was almost too embarassed to post it here. But see how the children love it.


Friday, July 17, 2009

A 'Present' Cake

How time flies! I have not posted a single entry in more than a month!

Had been busy at work and at home, can hardly find time to bake or cook. But July is a special month. July 12th is Samantha's birthday. She turns four this year.
Most times, she makes me really proud of her. She adores her baby sister and is always the loving, considerate big sister. She knows her 'please' and 'thank yous'. When we share a slice of cake, she'd ask 'mummy, do you want anymore?', before she ate up the rest of the cake. When I complain of aches, she'd immediately massage for me and ask 'Is this better?'. She is a sensible, sensitive little girl.

But she has an extremely stubborn streak and throws her fair share of tantrum regularly. Meal times are a struggle too, unless its at McDonalds.
So for my little girl, I have baked a total of three cakes for her. This is the first one, for celebrating with the cell group. Its not for her alone, but for all who were born in month of July.

A chocolate cake covered with chocolate fondant (I bought from Kitchen Capers) and decorated with pink fondant ribbons.


It looks too boring, so I added a gift card.


Then I added a little bear.


Bear is totally mobile.


Will showcase the other cakes in another post. Snoozing time....

Saturday, June 13, 2009

Chocolate Crinkles

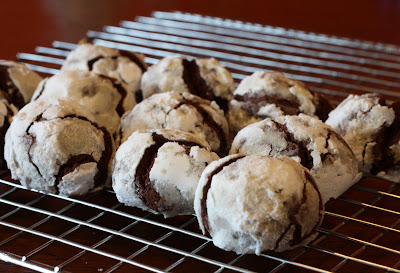
Today, I baked the Chocolate Crinkles that were featured in the Sunday Times recently. These cookies are also called Black and Whites, a fudge like chocolate cookie that is encased in a coating of confectioners (powdered or icing) sugar.

I forgot to coat mine with icing sugar, so it ended up as cracked little mounts of chocolate cookie. But nonetheless, it tastes so good. I used the best ingredients I have. Valrhona dark chocolate, Valrhona cocoa powder and madagascar vanilla essence. Its so chocolatey that after just one cookie, I could almost feel a sorethroat coming. :-(


These are my crinkles.


Apologies for a ill-focused picture.

The real crinkles are meant to look like this. Taken from Joy of Baking.


Look so much more lovely, doesn't it. I still have some dough in the fridge. Will try to coat the second batch tomorrow.

The recipe is adapted from Field Guide to Cookies by Anita Chu.
Make about 20-22 cookies (I made about 22, with leftover dough for about another 8 cookies)


Ingredients


170g dark chocolate
85g butter
1 Tbs brandy (optional)
185g plain flour
2 Tbs cocoa powder
3/4 tsp baking power
115g sugar
2 eggs
1 tsp vanilla
1/2 tsp sea salt


Method
1. Melt chocolate, butter and brandy together bain marie or using the microwave. Stir well and set aside to cool.
2. Sift together the flour, cocoa powder and baking powder. Set aside.
3. Beat eggs and sugar until thick and smooth using a mixer. Add vanilla and the melted chocolate. Mix until combined. Add the flour and cocoa mixture and the salt. Mix until well combined.
4. Scoop the dough out into a plastic container with a tight fitting lid. Cover and refrigerate for at least 2 hours or overnight.
5. When ready to bake, preheat oven to 170 degree C. Take the dough out of the fridge and let soften for 20 minutes while the oven preheats. (I did not wait 20 minutes, only 5).
6. Line cookie sheet with baking parchment. Scoop out generous tablespoonfuls of dough, roll into balls and place on the cookie sheet about 3cm apart. The balls should be about the size of an unshelled walnut. Place the unused dough back in the fridge.
7. Bake 10 to 12 minutes until the tops are cracked. Remove from oven, let cookie cool for about five minutes then transfer them to metal rack to cool completely.
8. Store cookies in air tight container.


Update:

Tried coating with icing sugar. Need to do it really fast as the icing melts easily coz the dough is wet.

Kitchen Capers store

Since Gina of Kitchen Capers opened her store in Kallang Bahru, I've been meaning to visit. And I finally did last Tuesday, 9 June, during lunch time.

I picked up quite a few things, had a very nice bowl of soya chicken noodle at the hawker center and had a chat with the very friendly Gina. Gina was very generous with her tips on decoration with fondant when I asked her some questions.

These are the things that I picked up:

Valrhona chocolates!


Never buy them before. Was looking forward to bake the chocolate crinkles featured on Sunday times. These chocolates will be perfect.

Fondant. I've tried quite a few brands and also homemade ones, but not these. I heard these are quite good, but it feels really soft.. am worried that it might be difficult to cover cakes with. But Gina say they work fine, so I bought two packets to try.


Miscellaneous - lollipop sticks -> for making cheesecake pops when I get the time. Silicon cups in rainbow colours... will be perfect for cupcakes and environmentally friendly too.


The Kitchen Caper store is located at:
Kitchen Capers
Block 71 #01-531F
Kallang Bahru
Singapore 330071
Tel: 6392 0159 Fax : 6392 0259
Opens daily from 10am to 9pm

Wednesday, June 3, 2009

Spare ribs with Garlic, Fermented Black Beans and Pumpkin

This is one of the first dish I ever cooked and probably the only one that I am totally satisfied. Try it if you have a chance.


Recipe from '100 homemade dishes' by Huang Mei Feng


Ingredients

450g pumpkin

450g spareribs

2 cloves garlic (sliced)

1.5 tbsps fermented black beans

1 sprig spring onion (shredded)

1 tbsp Shaoxing wine


Marinade

1/4 tsp sugar

1tbsp light soy sauce

1/2 tsp salt

ground white pepper

1/2 tbsp caltrop starch

1tbsp oil


Seasoning

1.5 cups water

1 tsp dark soy sauce

1/2 tsp sugar


Caltrop starch solution (mixed well)

2 tbsps water

2tsps caltrop starch


Method

1. Peel pumpkin. Seed and cut into pieces

2. Chop up spareribs. Wash and wipe dry. Mix with marinade. Leave for 15 minuts

3. Heat oil in wok. Stir fry fermented black beans and garlic until fragrant. Put in spare ribs and stir fry until golden brown. Sizzle shaoxing wine. Pour in seasoning and simmer for 20 minutes. Add pumpkin and simmer for another 10 minutes (or until pumpkin is soft). Thicken with caltrop starch solution. Sprinkle with shredded spring onion. Serve.