Showing posts with label cookies. Show all posts

Monday, July 27, 2009

Pistachio Almond Cookies

I love the cookies at Marks and Spencers. I was there to pick up some organic Camomile tea recently and browse through its array of cookies. There's my favourite rich tea and ginger snaps and a whole lot of new flavours! What caught my eye was Almond and Pistachio cookies, and Orange and Cranberry cookies. Well.. I did not buy them, but I was inspired to bake some cookies.

When I went home, I searched through the trusty network of food bloggers and found a Pistachio Almond Cookie recipe at Sugar and Everything Nice. The cookies looked so good, I printed the recipe and immediately get going.

I also saw a recipe in Kitchen Culture magazine, Cranberry Almond Cookies and decided to use the same almond cookie recipe base to make both cookies.

The result - I love the pistachio cookies! The cookie is so buttery and light and the pistachio added a nice nutty crunch. The cranberry ones are great too, but they taste much better the following day.


The pictures look so different, because they were taken at different times of the day. I really must work on my lighting. But I am lazy. As it is, I am already like squeezing out time to bake amidst looking after my three young ones on weekends.
Here's the recipe.
Pistachio & Almond Cookies
Recipe Adapted from The Cookie Collection
Makes about 30 cookies ( I made 28)
Ingredients:
225g unsalted butter, softened
140g castor sugar
1 egg yolk, lightly beaten
2 tsp vanilla extract
225g plain flour
55g ground almonds
55g pistachio nuts, finely chopped
1/2 tsp salt
Method:
1) Put the butter and sugar into a bowl and mix well with a wooden spoon (I use the mixer). Then beat in the egg yolk and extract.
2) Sift the flour and salt into the mixture. Add the ground almonds and stir until thoroughly combined. Halve the dough, shape into balls, wrap in clingfilm and chill in the refrigerator for about 40 minutes.
3) Preheat the oven to 190C. Line 2 baking sheets with baking parchment.
4) Unwrap the dough. Pinch some dough, about 1 tablespoon, and roll into a ball. Put on the baking sheet, spaced well part. Flattened each ball slightly with your palm.
5) Sprinkle some chopped pistachio on each cookie. Press lightly so that it stays.
6) Bake for 10 - 12 minutes. Leave to cool on the baking sheets for 5 - 10 minutes, then using a palette knife, carefully transfer the cookies to wire rack to cool completely.
I baked mine for about 13-14 minutes as I like it slightly firmer. For the cranberry variation, I added the cranberry into the dough prior to refrigeration.

Saturday, June 13, 2009

Chocolate Crinkles

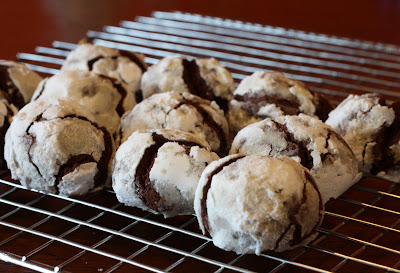
Today, I baked the Chocolate Crinkles that were featured in the Sunday Times recently. These cookies are also called Black and Whites, a fudge like chocolate cookie that is encased in a coating of confectioners (powdered or icing) sugar.

I forgot to coat mine with icing sugar, so it ended up as cracked little mounts of chocolate cookie. But nonetheless, it tastes so good. I used the best ingredients I have. Valrhona dark chocolate, Valrhona cocoa powder and madagascar vanilla essence. Its so chocolatey that after just one cookie, I could almost feel a sorethroat coming. :-(


These are my crinkles.


Apologies for a ill-focused picture.

The real crinkles are meant to look like this. Taken from Joy of Baking.


Look so much more lovely, doesn't it. I still have some dough in the fridge. Will try to coat the second batch tomorrow.

The recipe is adapted from Field Guide to Cookies by Anita Chu.
Make about 20-22 cookies (I made about 22, with leftover dough for about another 8 cookies)


Ingredients


170g dark chocolate
85g butter
1 Tbs brandy (optional)
185g plain flour
2 Tbs cocoa powder
3/4 tsp baking power
115g sugar
2 eggs
1 tsp vanilla
1/2 tsp sea salt


Method
1. Melt chocolate, butter and brandy together bain marie or using the microwave. Stir well and set aside to cool.
2. Sift together the flour, cocoa powder and baking powder. Set aside.
3. Beat eggs and sugar until thick and smooth using a mixer. Add vanilla and the melted chocolate. Mix until combined. Add the flour and cocoa mixture and the salt. Mix until well combined.
4. Scoop the dough out into a plastic container with a tight fitting lid. Cover and refrigerate for at least 2 hours or overnight.
5. When ready to bake, preheat oven to 170 degree C. Take the dough out of the fridge and let soften for 20 minutes while the oven preheats. (I did not wait 20 minutes, only 5).
6. Line cookie sheet with baking parchment. Scoop out generous tablespoonfuls of dough, roll into balls and place on the cookie sheet about 3cm apart. The balls should be about the size of an unshelled walnut. Place the unused dough back in the fridge.
7. Bake 10 to 12 minutes until the tops are cracked. Remove from oven, let cookie cool for about five minutes then transfer them to metal rack to cool completely.
8. Store cookies in air tight container.


Update:

Tried coating with icing sugar. Need to do it really fast as the icing melts easily coz the dough is wet.

Tuesday, January 27, 2009

Assortment of CNY cookies

Caught the cookie bug recently. Had been baking nothing but cookies. Here are the assortment of seven types of cookies I baked for Chinese New Year.


First, the pineapple tarts. Tougher dough for open tarts and melt-in-the-mouth-dough for closed tarts.


Peanut cookies and biscotti. I never quite liked peanut cookies, but MIL's old recipe is good. The peanut cookies tastes great after a few days.


Chocolate almond cookies, dried shrimp cookies and melting moments butter cookies.


A very happy Chinese New Year to you. Cheers!

Sunday, January 18, 2009

Pistachio Macaroons

I had been trying my luck at baking macaroons again. But alas, I had nothing but failures.

First attempt on 1 Jan 2009.


This batch has :
- no legs
- bad colour, not even green
- cracked top
Second attempt, 11 Jan. Same recipe

-With thin legs
- flat-ish
- not cracked, but uneven surface
- dis-coloured, uneven colour

Despite above, still continued to fill it. Tried both cream cheese and chocolate ganache filling.
Unable to figure out what's wrong. Any expert advise from anyone?

Got the recipe from Tartelette

Pistachio Macarons, adapted from Stephane Glacier.
Makes 35
225 gr powdered sugar
60 gr almonds
65 gr pistachios
3 egg whites (about 100gr)
green food coloring (optional) (powdered is better)
25 gr granulated sugar

In a food processor, run the nuts and powdered sugar until the nuts are finely ground. Run through a sieve if needed.
Whip the egg whites until foamy, slowly add the granulated sugar, until they are glossy. Add the green food coloring if using.
Slowly fold the nut/sugar mixture into the whites with a wide spatula. The mixture should remain shiny and flow easily.
Fill a pastry bag with the batter and pipe small rounds onto parchment lined baking sheets.
Let the macarons rest for 20 minutes.
Preheat the oven to 315 and when they are ready, bake them for 12-15 minutes.
Let cool, remove from the paper and fill with the ganache.

Finally.


These I bought from Bakerzin.

Tuesday, September 23, 2008

Chunky chewy chocolate chip cookies

This is one cookie my children and I enjoy. A big cookie with chunky dark chocolate chips. Yum.


I like the fact that its so simple and easy to make. I also like it in large sizes, large enough for me to decorate with royal icing on top. Unfortunately, did not manage to take pictures of those that i decorated.


Here's the recipe, adapted from a cook book. Ah..cannot recall name of book nor author, apologies.

Ingredients
220g brown sugar
110g caster sugar
225g self raising flour
75g plain flour
150g coarsely chopped macademias, toasted (I omitted this)
185g butter, melted, cooled
1 egg, beaten lightly
1 egg yolk, beaten lightly
2 teaspoons vanilla extract
200 g dark eating chocolate, chopped coarsely

Steps
1) Preheat oven to 180degree
2) combine sugars, shifted flours and nuts in big bowl
3) Add combined butter, egg, egg yolk and extract, mix to a soft dough
4) Stir in chocolate
5) Place 2 level tablespoons of biscuit dough, about 6cm apart on lightly greased oven trays
6) Bake about 16 minutes or until browned lightly.

For my version, I cut down the sugar by about 30% as we do not like it too sweet. Hope you enjoy it as much as we do.

Monday, July 21, 2008

Korova Cookies... so yummy

Came across the Korova, or World Peace cookies as they are commonly called, while surfing the internet. These cookies receive raving reviews from all who tried it and it seems so easy I simply have to try it.

I used the following recipe from Dorie Greenspan.

Ingredients
1 1/4 cups all-purpose flour
1/3 cup Dutch-processed cocoa powder
1/2 teaspoon baking soda
1 stick plus3 tablespoons unsalted butter, at room temperature
2/3 cup packed light brown sugar
1/4 cup granulated sugar
1/2 teaspoon fleur de sel, or 1/4 teaspoon fine sea salt
1 teaspoon pure vanilla extract
5 ounces bittersweet chocolate, chopped into small bits

Method

1 . Sift the flour, cocoa, and baking soda together and keep close at hand. Put the butter in the bowl of a mixer fitted with the paddle attachment and beat on medium speed until the butter is soft and creamy. (Alternatively, you can do this and all subsequent steps by hand, working with a sturdy rubber spatula.) Add both sugars, the salt, and vanilla extract and beat for another minute or two. Reduce the mixer speed to low and add the sifted dry ingredients. Mix only until the dry ingredients are incorporated — the dough will look crumbly, and that's just right. For the best texture, you want to work the dough as little as possible once the flour is added. Toss in the chocolate pieces and mix only to incorporate.

2. Turn the dough out onto a smooth work surface and squeeze it so that it sticks together in large clumps. Gather the dough into a ball, divide it in half, and working with one half at a time, shape the dough into logs that are 1 1/2 inches (4 cm) in diameter. (Cookie-dough logs have a way of ending up with hollow centers, so as you're shaping each log, flatten it once or twice and roll it up from one long side to the other, just to make certain you haven't got an air channel.) Wrap the logs in plastic wrap and chill them for at least 1 hour. (Wrapped airtight, the logs can be refrigerated for up to 3 days or frozen for I month.)

3. Center a rack in the oven and preheat the oven to 325°F (165°C). Line two baking sheets with parchment paper and keep them close at hand.

4. Working with a sharp thin-bladed knife, slice the logs into rounds that are 1/2 inch (1.5 cm) thick. (Don't be upset if the rounds break; just squeeze the broken-off bit back onto the cookie.) Place the cookies on the parchment-lined sheets, leaving about 1 inch (2.5 cm) spread space between them.

5. Bake only one sheet of cookies at a time, and bake each sheet for 12 minutes. The cookies will not look done, nor will they be firm, but that's just the way they should be. Transfer the baking sheet to a cooling rack and let the cookies stand until they are only just warm or until they reach room temperature — it's your call. Repeat with the second sheet of cookies.

NOTE: The dough can be made ahead and chilled or frozen. If you've frozen the dough, you needn't defrost it before baking — just slice the logs and bake the cookies 1 minute longer. Packed airtight, baked cookies will keep at room temperature for up to 3 days; they can be frozen for up to 1 month

Here's my chilled Korova 'log'.

Cut and ready to go into the oven.


Baked Korova Cookies!!


I really like the convenience of having a log of chilled cookie dough and cutting and baking it only when I feel like having some nice, warm freshly baked cookies.
Absolutely delicious, do try it!

Friday, June 27, 2008

Hands-on cookie baking for kids

I did not send my children for any enrichment classes during the holidays at all, felt a little guilty. So when I read in the papers about many parents sending their children for cookie baking and decoration workshops, I decided to try that at home.

Chose a simple recipe from Wilton's year book and let my kids help scoop flour, sugar, etc. They had fun, but they also made a huge mess, with my daughter trying to pick up every grain of sugar she dropped on the table to put into her mouth.
Here is my 'almost three' year old daughter working hard to roll the dough. Notice the beads of perspiration and smudges of flour on her forehead.


And my 'almost 5' year old boy hard at work too...


The results (a sample of them.. forgot to take pictures of the baked cookies) :


Conclusion:
- Its fun and cheap to do this at home, but messy
- Needs patient on part of the parent, no wonder some parents pay others to do this
- The wilton recipe is far too sweet
- Not sure if its over-handling of the dough, the cookie is hard like stone
- Girls seems naturally better than boys on this, my girl proved it

Friday, December 28, 2007

Nativity

Two Christmases ago, I saw a nativity cake on CakeCentral and secretly harboured the ambitions to create a similar cake. It was full of beautifully hand modeled fondant figurines that I can only dream of making. This Christmas, I finally made my version of the nativity cake, drawing inspirations from the one that I've seen, for a family Christmas eve party.

Here's Joseph, Mary and baby Jesus....


I used store-bought Wilton fondant to mould the figures. I usually buy the white coloured ones as they are cheaper and I can colour them on my own, using Wilton gel colours. Baby Jesus was suppose to be sleeping on a bed of straws.. I did not have the tools to make the straws so it looked as if he is sleeping on a bed of worms... The two beige round lumps you saw at the back are 'heads'. I was thinking of making the three wise men but I ran out of fondant and had to make two shepherds instead. Then I realised I did not even have enough fondant for two shepherds... so I made my own gumpaste (since this is the only recipe I have on hand that I have all ingredients).

Here's the final cake.


The pictures was not very well taken as I only managed to finish the cake like half an hour before the party and the lighting was bad. But I thought its a very lovely cake, couldn't wish for more. Cake is 12" chocolate banana cake with low fat ganache (recipe from Creative Culinaire).
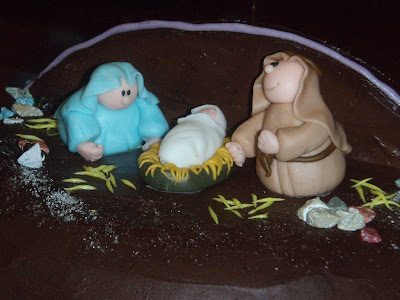
Closeup.


The thing about fondant is that it 'sweats' when put on top of icing and colour can smear so I usually try to use less strong colours to prevent dis-colouring my cakes.


My favourites are the little lambs.. they are tiny as a twenty cent coin and really cute. I smeared compound chocolate on the cake board, let it harden about 80%, then sprinkled some brown caster sugar on top before placing the figures on top. I like the effect, it looks like sand with a little bit of shimmer. Grass is icing sugar left over from my cookies decoration.

The shepherd with the beard is made with my home-made gumpaste and it dried solid hard but is also brittle, especially the thin parts. The fondant made ones are still malleable. This is my first experience with gumpaste.. will try putting him in the fridge to see if he 'melts'.


Here are some of the cookies that I made. Merry Christmas and a very Happy New Year to you!! Cheers!!


And a very happy snowman!

Monday, December 10, 2007

Christmas!!

Wow! Has been more than a month since my last post... how time flies...

Had been busy at work and at home with little time for baking. Even had to turn down some opportunities to create cakes.

My little girl is going through the 'terrible twos' phase and her bad temper is ignited by the smallest thing that goes against her wishes. She'd then cry inconsolably for the next hour. I'm almost pulling my hair out!

Anyway, here are some cookies and treats I made last year for the Christmas season. I pray I get sometime to do the same this year.

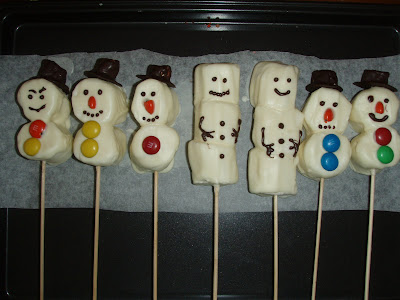
1) Marshmellow Snowman


Marshmellows coated with white chocolate, on a skewer. M&M buttons and noses. Eyes and hands are piped chocolate. Easy to make and oh so cute!

2) Christmas cookies

An assortment of chocolate cookies (recipe taken from wilton), decorated with royal icing, which I packed in little bags and gave away to dear colleagues in the office.

How long did it take to decorate these? Back-breaking long.


3) Joy to the World!


The Lord is come! Christ bring salvation to the nations and we celebrate with joy, the birth of baby Jesus.


Stained glass effect created using coloured piping gel.


A Merry Christmas to all! May you experience the real joy of Christmas.